Getting started with local LLMs (part 3)
Welcome to Part 3 of the “Getting started with local LLMs” blog series. If you’re just arriving here for the first time, here’s a link to Part 1 of the series where you learn how to determine which models you can run on your current hardware 😄 And for those returning to the series—it’s time to figure out which harness is most likely to fit your needs and preferences.
And as always, before anyone tries to accuse me of using AI to write this blog post: these em-dashes, colons, semicolons, emojis, code snippets and blocks and so forth have been painstakingly crafted by human hands, TYVM 😜 And with that said…
What the heck is a harness?
Simply put, a harness is the interface you use to interact with Large Language Models (LLMs). You’ve likely already heard of claude, codex, and gemini-cli—and just like NodeJS frameworks before them, there are many more harnesses popping up every day.
Some harnesses are very minimalist, while others are full-featured; some are easily customized, where others are “what you see is what you get”. All of the harnesses I discuss later in this post are available via the command line interface (CLI), but there are plenty of harnesses that provide a graphical user interface (GUI) experience, such as Maestro [1], if that’s more your speed.
But before I get into all of that, let’s talk about why choosing a harness matters.
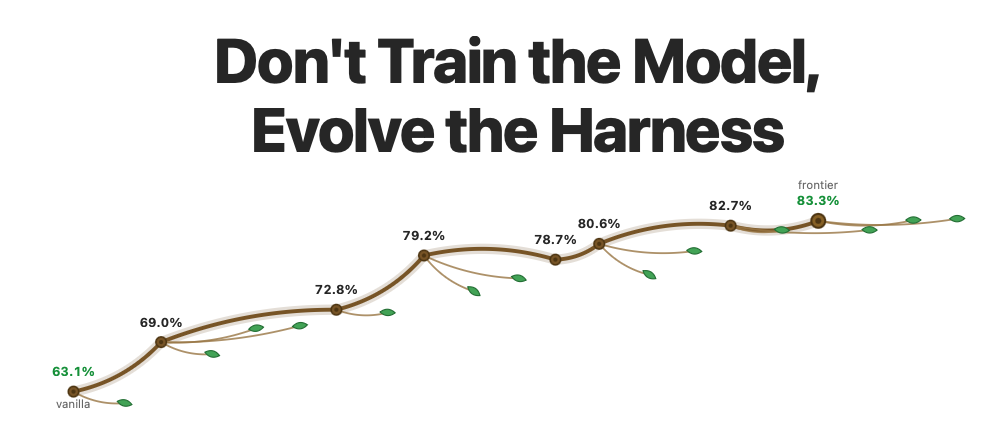 Figure 1. Harness optimization research from Hugging Face.
Harness overfitting
Unfortunately, choosing the right harness for your local LLM setup is more challenging than it used to be. Models are increasingly trained to use specific harnesses, and as a result people are seeing more tool call errors when a model is “overfit” to a different harness than what they’re using. What this means is that your harness will likely affect the outcomes of the model you’re pointing it at.
Armin Ronacher, the author and maintainer of pi, first recognized this problem back in July [2]. Around the same time, Hugging Face published research about optimizing an agent harness to a specific benchmark [3]. Hugging Face also followed-up with another research paper (along with some tooling) in September [4], highlighting their observed differences in model performance as a result of the harness they chose. All of this means that choosing the best harness for your local LLM is, as I stated earlier, more difficult than it used to be.
Choosing the best harness for you
That said, allow me to use operating systems (and Linux flavors) as an analogy for the many different popular LLM harnesses available today. I’ll leave you to discover how to install these for yourself, but you should know what’s available before you start experimenting. And if you’re like me, you probably care about how much effort is required to get your harness setup “just right” before you’re able to really start working with it.
First, as I’ve already mentioned, there’s pi [5]. It’s sort-of like Arch Linux in that it has a tiny core set of functionality, and you have to assemble the other functionality you might want (like sub-agents and web search) through extensions. Then there’s oh-my-pi AKA omp [6], which is a fork of pi and is sort-of like Manjaro—or perhaps Debian (sorry to those whom I’ve just offended with this comparison). Anyway, it’s still pi, but with “batteries included”. This is the harness I currently use, and a lot of the functionality “just works” for my local LLM setup.
Then we have hermes [7], which is sort-of like Fedora. It’s backed by a research lab and is open source; and ironically, just like Red Hat, they also offer a paid version if that’s something you’re looking for. And then there’s frontier AI lab harnesses like Codex CLI [8] by OpenAI, which is a bit like Ubuntu in that it’s open source—but it’s clearly a company’s product that pushes you to use their models and services. Anthropic’s Claude Code [9] on the other hand is a bit like macOS; Anthropic built the harness so that it works best when paired with their LLMs.
There’s also OpenCode [10], which in this analogy is sort-of like Linux Mint. It’s open source and provides a polished experience while making it easy to choose your own provider. This is an especially popular harness for many people working with local LLMs.
Rounding things out there’s Gemini CLI [11], which I’ll say is a bit like ChromeOS in that it’s made by Google, and works best within Google’s ecosystem. A lot of people start their journey with Gemini because it also happens to be free. There’s also GitHub Copilot [12] which of course in this analogy is Windows; it’s the enterprise default most people use at work because IT and Security have already approved it. And finally there’s Cursor [13], which is a polished derivative of VS Code now owned by SpaceX (or whatever Elon is calling the company these days 🙄).
Measuring model + harness efficiency
So, how do you choose the right harness if you know it might affect the performance of your local LLM? The short answer is to run your own benchmarks. What those benchmarks actually look like depends entirely on your own use cases for local LLMs, but a simple one from a business context might be your backlog of previously patched vulnerabilities.
For example, you can checkout code from just before a patch was implemented to see if your model + harness combination can find the vulnerability in question. You might even try asking your local LLM to write a series of patches and see if it comes up with the same fix. There’s a nearly infinite number of examples like this in a business setting.
Anyway, determining how you want to measure model + harness efficacy is something only you can decide. If you’re an individual and you want to discuss this further, feel free to tag me in a post on social media. And if you’re a business that would like to learn more about setting up benchmarks, send an email to keith+consulting [at] securing [dot] dev 👍
Routing your prompts to the right model
Alright, so now that you’ve chosen a harness, let’s go a little deeper. If you want to route your harness to the right model for the job, you’ve got a handful of options. I’ll start by noting that omp will do this out-of-the-box after setting up roles for the local LLM(s) you’ve listed in your models.yaml file. That said, if you’re using claude or codex things get a bit more complicated.
So, while you can change your settings so that the frontier AI lab harnesses like claude and codex point to a local LLM, you’re going to be stuck with just one model per config unless you use a model gateway. I’ve added a handful of example files for each of the frontier lab’s harnesses to the “Getting started with local LLMs” GitHub repo [0] for your reference.
In terms of model gateways, the one I recommend for your local LLM setup is LiteLLM [14]. That said, you’ll need to run a small “classifier” model somewhere if you want to use the automatic prompt routing configuration I dropped in the GitHub repo. To use it, simply download and modify the models (and where they can be reached at) before running:
1

litellm --config litellm-config.yaml --port 4000
Note: you’ll also want to review and update your Tailscale ACLs as necessary to ensure that the box LiteLLM is running on can reach the inference servers and ports!
Having said that, it’s worth it if you can support the additional model overhead for the automatic prompt routing with spare capacity on a fast GPU. Doing so allows you to point your harness at a single LiteLLM endpoint and then have it do all of the intelligent prompt routing for you. Just don’t forget to update your models.yaml (or similar harness config settings) to point to your LiteLLM instance before trying it out for yourself 😉
Bonus content: get notified when your agent is done cooking
Something fun that I’ve enjoyed using while working with agents is an app called peon-ping [15]. If you’ve ever played a real-time strategy game like WarCraft or StarCraft, it’s the same concept of being notified when a job is completed by having your peon or SCV giving an audio cue (i.e. “work complete!”, “ready to go, sir!”, etc.) while you’re focusing on something else.
You can download all sorts of sounds from peon-ping, but the real benefit is that you can relay the sounds over SSH from your dev machine to your laptop via Tailscale! Setup is pretty easy, and here are the commands you’ll want to use to get this running.
On your remote dev machine (assuming Linux):
1

curl -fsSL https://raw.githubusercontent.com/PeonPing/peon-ping/main/install.sh | bash
Then choose which pack(s) you want to use:
1
2
3
4

peon packs list --registry     # browse everything
peon packs install glados      # install one or more (comma-separated)
peon packs use glados          # switch
peon preview task.complete     # test it
Finally, setup ssh audio relay via Peon Ping to your Tailnet MagicDNS name (or Tailscale IP)
1
2

export PEON_RELAY_HOST=macbook # your system's MagicDNS name or 100.x IP
peon ssh-audio relay
On your laptop (assuming macOS):
1
2
3
4

brew install PeonPing/tap/peon-ping && peon-ping-setup
peon packs use glados
peon relay --daemon --bind=$(tailscale ip -4)
peon relay --status
And that’s it! So long as you’re using the Tailscale ACLs I included in the GitHub repo [0] and you’ve tagged your laptop as dev, this should “just work” when you’re SSH’d into your dev machine to do some remote Agentic tasks. You’ll receive an audible (and visual) notification when your Agent runs into a problem, needs additional input, or completes a task. Pretty sweet, huh?
What’s coming up in Part 4
If you made it this far, thank you for sticking with me 🙏 this was (yet again) a longer posted than I anticipated! Anyway, you should now be ready to play with various harness/model configurations, and if you’ve followed my LiteLLM configuration, you’ll be able to test your preferences for manually switching models vs. having your prompts routed automatically 😊
In the next installment of this series I’ll teach you how to setup locally hosted web search using Firecrawl (thanks Mark!), tips for organizing your Agent’s memory (”second brain” vs. “LLM wiki”), and hopefully by then I’ll be ready to share the tool I designed to manage my local LLM “load outs” across various devices.
Stay tuned!
While I’m preparing the next installment in this series you can git checkout other (usually off-topic) content I’m reading more regularly over at Instapaper.
Until next time, remember to git commit && stay classy!
Cheers,
References
[0] https://github.com/andMYhacks/getting-started-with-local-llms
[1] https://github.com/RunMaestro/Maestro
[2] https://lucumr.pocoo.org/2026/7/4/better-models-worse-tools/
[3] https://huggingface.co/spaces/joelniklaus/harness-optimization#introduction
[4] https://huggingface.co/spaces/FineEnvs/multi-harness-rl#introduction
[5] https://pi.dev
[6] https://omp.sh
[7] https://hermes-agent.nousresearch.com
[8] https://github.com/openai/codex
[9] https://github.com/anthropics/claude-code
[10] https://github.com/anomalyco/opencode
[11] https://github.com/google-gemini/gemini-cli
[12] https://github.com/features/copilot
[13] https://cursor.com/home
[14] https://github.com/BerriAI/litellm
[15] https://github.com/PeonPing/peon-ping